Using TraefikEE with AAD as OIDC provider
For a long time, we've been successfully using Apache and mod_authnz_ldap to secure some of our legacy applications. Our employees could easily log in via their LDAP credentials. And while it worked, it had its problems.
When we made the move to Office 365, it was clear that at some point our old LDAP infrastructure will be fully replaced with Azure Active Directory (AAD) but I haven't had a good replacement for our simple mod_authnz_ldap solution until I realized that Traefik EE comes with an OIDC middleware.
Disclaimer: I am a Traefik Ambassador, so I might be a little bit biased ;)
Apparently, it is not that complicated to enable OIDC support in Traefik EE and secure your application with it. The configuration on the AAD side is straightforward. Still, I cover the whole process in this blog post so that you can easily follow along.
The first step is to register a new application in AAD. Click on the "Enterprise applications" in the favourite section on the left-hand side of the screen.
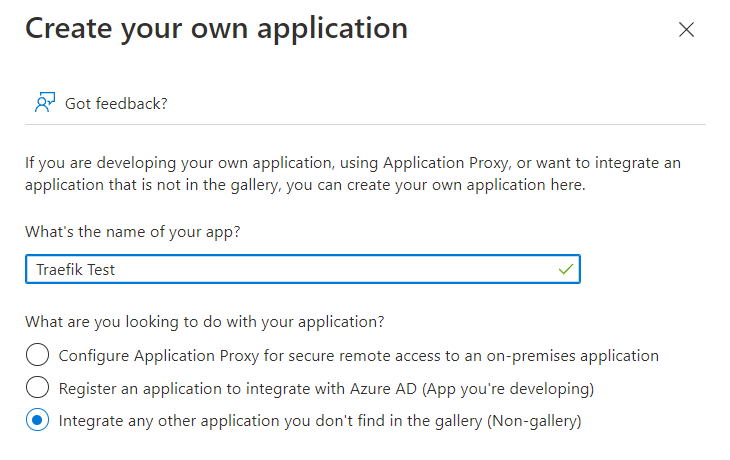
On the next screen, click the "New application" link and enter the name of the new application.

Once the application got created, click on the "User and groups" link to configure who can access and get authorized via the application. Depending on your AAD license level, you can only directly assign users or even assign groups.
Once that is done, switch to the "App registrations" configuration in your Azure Active Directory. Select the app you've just created to configure client credentials and API permissions.
First, we configure the client credentials which are needed by Traefik EE later. In the menu bar click on "Certificates & secrets" and create a new secret by clicking on the "New client secret" button.
In the next dialog enter a description and the expiration date.
After adding the new client secret, you can find it the list of the client secrets on the screen. Besides that, we also need the application Id which can be found on the overview page. That's enough information to configure Traefik EE properly. But we still need to make a few more adjustments to let Traefik EE properly communicate with AAD.
Without configured API permissions, our AAD application cannot authenticate the user. Click on the "API permissions" link in the menubar and click "Add a permission" on the next screen.
In the popup that appears choose "Microsoft Graph" as API and choose the "Delegated permissions options". In the list of permissions pick the "User.Read" permission.
Next, we need to configure the Redirect URI for our application. This needs to match the URL of our application registered with Traefik, otherwise AAD will refuse to work properly.
In the left menubar, click on the "Authentication" menu and select "Add a platform". In the next screen pick "Web" as the platform type and then enter the Redirect URI, e.g. https://myapp.loc/callback - AAD requires you to use an HTTPS Url when not using localhost for security purposes. That means Traefik needs also to serve HTTPS requests for your application!
Next, we configure the Traefik EE controller to be aware of the OIDC connection. In your controller configuration, add an "authSources" section as follows:
[authSources]
    [authSources.oidcSource]
        [authSources.oidcSource.oidc]
            issuer = "https://sts.windows.net/3412a8eb-ca4b-46ad-9560-7f178e84ebd1/"
            clientID = "18a1dc03-1b88-477e-8222-17c65c42ca6c"
            clientSecret = "Pxr8Q~_AWEfk3.t-QoeC7dxhc-gu~piwZV-uGbRL"
The clientID can be found on the overview page of your AAD application, and the clientSecret is found in the "Certificates & secrets" section. Pick the value setting from the list for the clientSecret.
Getting the correct issuer URL was a bit more tricky. At first, I used https://login.microsoftonline.com/3412a8eb-ca4b-46ad-9560-7f178e84ebd1/oauth2 because that was the URL I could see in the endpoint configuration of the AAD application. Once I tested it with this URL, Traefik EE displayed an error stating this was the wrong URL and I have to use
https://sts.windows.net/3412a8eb-ca4b-46ad-9560-7f178e84ebd1/ instead. I am not sure why this happened, but check the logs in case something does not work.
Once saved, apply the new configuration via:
./teectl apply --file=traefik.toml
As the last step, we need to configure our docker service to use the OIDC connector. Assuming our service is already configured to be served via HTTP & HTTPS, the Traefik configuration looks like this:
services:
  whoami:
    image: traefik/whoami
    labels:
      - "traefik.enable=true"
      - "traefik.http.middlewares.whoami_https.redirectscheme.scheme=https"
      - "traefik.http.routers.whoami.entrypoints=web"
      - "traefik.http.routers.whoami.rule=Host(`whoami.loc`)"
      - "traefik.http.routers.whoami.middlewares=whoami_https@docker"
      - "traefik.http.routers.whoami_https.rule=Host(`whoami.loc`)"
      - "traefik.http.routers.whoami_https.tls=true"
      - "traefik.http.routers.whoami_https.entrypoints=websecure"
The configuration needs to be extended by the following 3 lines:
      - "traefik.http.routers.whoami_https.middlewares=whoami-auth"
      - "traefik.http.middlewares.whoami-auth.plugin.oidcAuth.source=oidcSource"
      - "traefik.http.middlewares.whoami-auth.plugin.oidcAuth.redirectUrl=/callback"
The oidcAuth plugin needs to point to the source for the authentication, oidcSource is the name of authSources
configuration found in the Traefik EE controller above. The redirectUrl path needs to match what you have configured
on the AAD application side.
Once you restart or redeploy your service, the configuration should now work. Once you access your service
at https://whoami.loc you'll be redirected to AAD to authenticate. When successfully authenticated, you'll get
redirected to your application.
Outlined above, this is the simplest configuration to get an OIDC setup working. Traefik EE supports a lot more options which are all documented here: https://doc.traefik.io/traefik-enterprise/middlewares/oidc/
