Nomad OIDC authentication with Entra ID

Nomad version 1.5 comes with Single sign-on (SSO) and OIDC support. As we shifted to an Office 365 environment some time ago, we have been using Entra ID (previously known as Azure Active Directory) as our primary SSO solution whenever possible.
Unfortunately, the entire process of configuring OIDC - specifically with an Entra ID endpoint - is not well-documented, and troubleshooting single sign-on issues is still quite challenging. Although Hashicorp is aware of this, it may take some time before debugging becomes easier.
Following a few resources I found online, I was able to put the puzzle pieces together and not only get a basic authentication via Entra ID done but also configure Nomad roles based on Entra ID groups the user is assigned to.
Let's create an App registration in Entra ID first. Open https://entra.microsoft.com/ and navigate to Applications > App registrations and select New registration. Enter a name for the App registration (e.g., Nomad) and click the Register button.
For the OIDC process to work, your Nomad UI needs to be reachable via a domain name and have an SSL certificate configured, as Microsoft will only allow https://URLs for the redirect flow that we will configure next.
Open the Authentication tab, click the Add platform button, select Web and in the form that is showing next, enter an url like https://example.com/ui/settings/tokens. Replace example.com with your specific domain name. We also need to configure https://example.com/oidc/callback as a second redirect URL by clicking the Add URI button on the overview page. Once done, it should look like this:

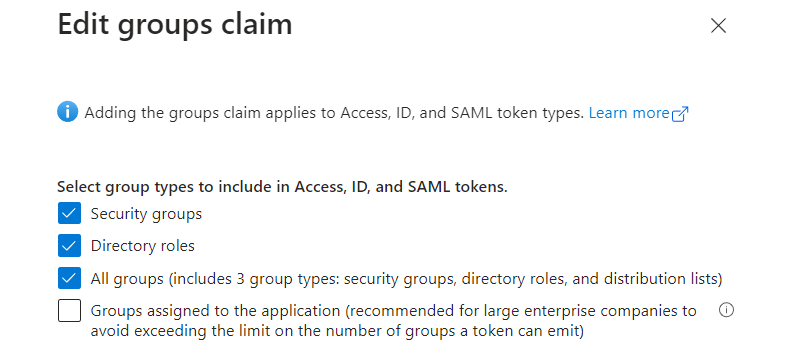
By default, Entra ID will not expose the user's group information. This needs to be configured by adding a group claim. Navigate to the Token configuration tab and click the Add groups claim button. In the next dialog, select Security groups, Directory groups, All groups and click the Save button.
Next, we can start configuring OIDC on the Nomad side. To do that, we create a JSON configuration file called /etc/nomad.d/oidc-config/config.json with the following settings:
{
  "OIDCDiscoveryURL": "https://login.microsoftonline.com/[TENANT_ID]]/v2.0",
  "OIDCClientID": "[CLIENT_ID]",
  "OIDCClientSecret": "[CLIENT_SECRET]",
  "BoundAudiences": ["[CLIENT_ID]"],
  "AllowedRedirectURIs": [
    "https://example.com/oidc/callback",
    "https://example.com/ui/settings/tokens"
  ],
  "ListClaimMappings": {
    "groups": "groups"
  }
}
In the configuration file, replace [TENANT_ID], [CLIENT_ID], and [CLIENT_SECRET] with the values found in the App Registration of your application.
To be able to access the group information later and make decisions based on the groups, the "ListClaimMappings" section is needed in the configuration file. This maps the "groups" data from the Entra ID response to a list called "groups" that Nomad understands.
The JSON file created is used to create an auth method in Nomad. To do that, run the following command:
nomad acl auth-method create -type=oidc -name=oidc2 -config=@/etc/nomad.d/oidc-config/config.json -max-token-ttl="15m" -token-locality=global
As a result, you should see a Sign in with oidc2 button on the login screen of Nomad:

Next, we create the policy configuration for the role, aka what the role is allowed to do. Let's start with a "read-only" role for our developers by creating a file /etc/nomad.d/oidc-config/acl-developer.json with the following content:
{
    "Name": "developer",
    "Description": "Allow read-only access for developers",
    "namespace": {
        "default": {
            "policy": "read"
        }
    },
    "agent": {
        "policy": "read"
    },
    "node": {
        "policy": "read"
    },
    "quota": {
        "policy": "read"
    },
    "operator": {
        "policy": "read"
    }
}
To import the oidc-developer-policy policy into Nomad, run the following CLI command:
nomad acl policy apply oidc-developer-policy /etc/nomad.d/oidc-config/acl-developer.json
Next, we have to create a role oidc-developer in Nomad and bind the role to the oidc-developer-policy we've just set up:
nomad acl role create -name "oidc-developer" -policy "oidc-developer-policy"
And last, a binding rule needs to be created that maps the Entra ID users to local Nomad users:
nomad acl binding-rule create -bind-name "oidc-developer" -bind-type "role" -auth-method "oidc2" -selector='"6ad5fd44-f9e1-6c12-9e2a-4c807dc4d8a2" in list.groups'
In the selector parameter, you can see two things: First, we are referencing the group's field we mapped from Entra ID earlier. Second, the string "6ad5fd44-f9e1-6c12-9e2a-4c807dc4d8a2" represents the Entra Group ID that should be mapped to the "oidc-developer" role in Nomad. Also, it is important to use the double quotes, otherwise Nomad tries to interpret the string as a number and fails parsing it.
Once the command is run, you should be able to log into Nomad via Entra ID. Access to Nomad is granted if the user is part of the referenced Entra group.
If you set up multiple roles in Nomad and map that to multiple groups in Entra ID, every role that matches the selector will be assigned to the user. This way, you can go from read-only roles to roles with write access based on your needs.